Saturday 17 September 2011

gingerbread house

The Gingerbread House Frame

Take a cardboard box and cut off the top flaps. Using cardboard pieces from other boxes, make a slanted roof and tape it together with masking tape. Don’t worry about what the box frame looks like – it will be covered with graham crackers and cereal and all the flaws will be hidden.
If you’re going to include a yard with your gingerbread house, set the frame on a large sheet of cardboard or foam board.

The Icing Mortar

You’ll need a thick icing to hold everything onto your house frame. Here’s a recipe for icing that’s easy to spread, but that dries quickly as hard as cement.

Gingerbread House Icing Recipe

This recipe can be doubled for a larger gingerbread house.
  • 1 pound powdered sugar
  • 3 egg whites
  • ½ teaspoon cream of tartar
  • Dash of salt
  • 7 tablespoons water
Sift together powdered sugar and cream of tartar. Combine all ingredients in a large bowl. Mix with an electric mixer for about 8 minutes at high speed. Keep the bowl covered with a damp dishtowel while you’re working with it, to keep the icing from hardening in the bowl.

The Siding

Buy two boxes of generic or store brand graham crackers and carefully pull out the unbroken crackers.
Spread some icing on the house frame and press a graham cracker onto it. Don’t push too hard or the graham cracker will break. The more icing you use, the easier the construction will be. Cover the entire frame.

The Roof

Cover the roof with Frosted Mini Wheat cereal for the look of a thatched roof with a dusting of snow. Starting at the bottom of the roof line, spread on a line of icing and place the cereal squares in a line across the bottom. Repeat with a line above, overlapping slightly the row below it, so each layer hangs down over the top of the row below.

The Decorations

Decorate your gingerbread house with candy from the bulk candy section of your grocery store, cake decorations and anything else that’s edible and pretty.
Use your imagination: What foods look like things on your house? You can stack up caramels for a chimney, use a Hershey bar for a door, line up M&M’s for a string of Christmas lights, use a Lifesaver for a door wreath, and post candy canes for lampposts. Other candies perfect for gingerbread house decorations are Skittles, peppermints, gum drops, Tootsie Rolls and Hershey kisses.

handprint/footprint canvas gift


What you'll need:

  • Cheap plain canvas
  • pots of kiddies paints
  • newspaper
  • fabric paint pens
  • tray
  • wipes
  • child/children

What to do:

Step 1: set out all the newspaper and pour small amount of paint into trays.
Step 2: get kids to wash hands/feet (which ever your using)
Step 3: place canvas on floor and place childs/childrens hands/feet into paint
step 4: placehands/feet onto the canvas.
Step 5: waiting for paint to dry and add a lovely poem or childs information and age at time of print.
Step 6: if you want to brighting it up add both hands and foot prints and maybe glue some lovely ribbon onto the cavas

wrap and ready to go any parent/grandparent will love this

How To Make a Secret Hollow Book:

The first step into making the hollow book is to select a book. Make sure this is a book your own, and not one belonging to the library, or your family. I suggest rummaging through books at yard/garage sales.


Make sure it is a hardback; otherwise you will cut all the way through the other side when you are cutting out the insides.
You'll also need:

  1. Elmer's white glue
  2. a container to hold glue solution (I've chosen a film canister)
  3. X-acto knife, and/or box cutter. Both if you have them
  4. brush to apply glue solution
  5. pencil/pen
  6. ruler, or other rigid straight edge

Select a page that you want to be the first one cut out, and save that page to be cut out at the end. (I'll explain later) Even if you don't want to save any pages at the beginning of the book, you must set one aside for a later step.

Mix a solution of white glue and water. Just enough for the glue to be runny, and absorbed by the edge of the book's pages. 50% to 70% glue (30% to 50% water) worked well for me. - Half a film canister full was enough for this book.

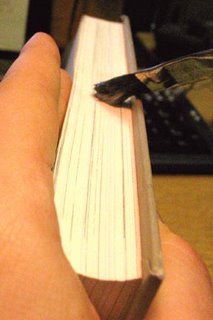
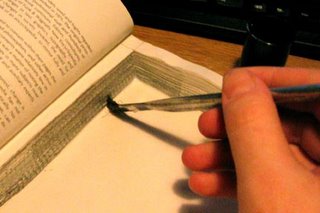
Holding the remaining pages together, brush the edges with the glue solution - enough to soak in pretty well, but not too drippy.


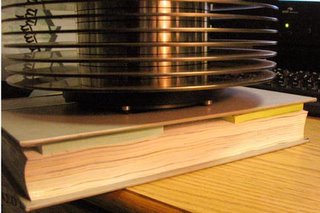
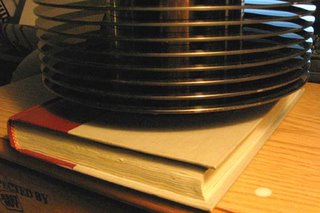
Allow this to dry, but use a spacer so the first couple pages, and the front cover don't get stuck. I spaced mine with post-it notes, and used some old hard disk platters to apply pressure. It dries quickly- about 15 to 30 min


When dry, open the book to the first glued page.

Draw out a half-inch boarder around the edge on all four sides. (Don't forget along the spine too.)


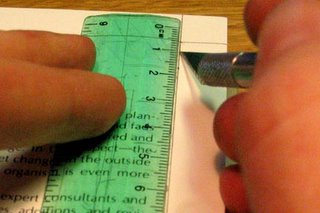
Using a strait edge and knife, cut out along the inside of the line. Try to make the cut as vertical as possible, or else try to tilt so the hole will narrow as you go down.


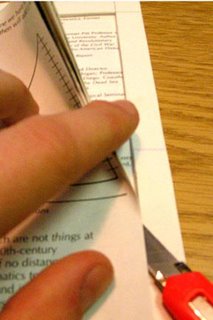
Continue cutting down through the layers. I found that a box cutter was easier to keep straight. This part takes a long time. I recommend listening to music while you work. Watching TV though could be distracting, and you could also cut a page out of your finger. (no, I didn't.)


The longer you spend on it, the smoother and straighter the inside edges of your book will be. My first attempts at this yielded rough edges, but the fuzz flattens down a little when glued (later).

After a while, you can store some of your tools in it while you take breaks. I did this book in 2 evenings.


When you get to the back of the book, and through the last page, stop. Dump out all the little paper fuzz that inevitably comes from the cutting.

Next, brush the glue solution on the inside edges of the pages. Give it a bit to soak in. A little bit of drippiness is okay, as the glue dries clear. This is also a good time to apply a second coat to the outside of the pages with the excess glue.


Brush the rim of the book with a light coat of glue. This will affix it to that one page we saved earlier (and will cut through later).


Close the book again, this time without any spacers. Give it another 15-30 minutes to dry. Clean up any glue that drips on your desk, like it did mine.


Remember that first page we saved? It’s now glued to the rest of the book. Lets all turn there now.

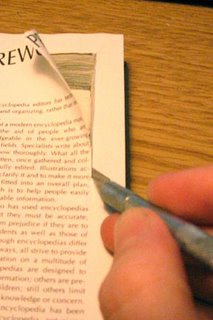
Cut through this first page with your knife to open it. The insides of the book may still be a little gooey since there was no air inside to let it dry. -So let it dry now.


When it’s dry, you're done!

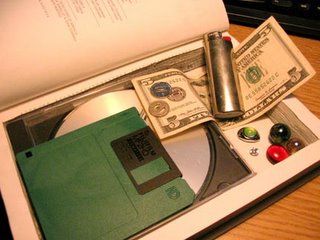
Fill it with whatever treasured items (or contraband) you choose.


Happy hiding.

Chocolate snowballs recipe

Ingredients
  1. 60g good-quality dark chocolate, chopped
  2. 125g unsalted butter, softened, plus extra for greasing
  3. 370g soft brown sugar
  4. 2 medium free-range eggs
  5. 1 tsp vanilla extract
  6. 80ml milk
  7. 340g plain flour
  8. 2 tbsp unsweetened cocoa powder
  9. 2 tsp baking powder
  10. ¼ tsp ground allspice
  11. 85g chopped pecans
  12. Icing sugar, for dusting

Method

  1. 1. Melt the chocolate in a heatproof bowl over a pan of simmering water, stirring occasionally.
  2. 2. Using an electric hand whisk, cream the butter and sugar until light and fluffy. Add the eggs, one at a time, beating after each addition. Stir in the vanilla, melted chocolate and milk.
  3. 3. Sift the flour, cocoa, baking powder, allspice and a pinch of salt into the bowl and mix well. Stir in the pecans. Chill, covered, for 3 hours, or overnight.
  4. 4. Preheat the oven to 180°C/fan160°C/gas 4. Lightly grease 2 baking sheets. Sift some icing sugar onto a plate. Roll heaped teaspoonfuls of mixture into balls, then roll in the icing sugar to coat. Place on the baking trays, spaced to allow for spreading.
  5. 5. Bake for 15 minutes until lightly browned and still a little soft in the centre. Leave to cool on the trays for 3-4 minutes, then transfer to a wire rack to cool completely.

Nutritional info

Per snowball: 94kcals, 4.2g fat (1.9g saturated), 1.4g protein, 14g carbs, 8.2g sugar, 0.1g salt

Tropical Sugar Scrub

Sugar granules gently remove dead skin cells, which are in turn nourished by the combined power of coconut, mango, and orange.

Ingredients

  • 1 cup white sugar
  • 2 Tbsp freshly squeezed orange juice
  • 1/4 cup fresh mango puree
  • 1 cup coconut oil

Instructions

Mix sugar into coconut oil until evenly distributed before stirring in lemon juice and mango puree. Store in an airtight container in the refrigerator. When ready to use, scoop out a generous amount of sugar scrub and rub with open palms into skin. Rinse well.

Lemon Salt Glow

Sea salts bring a healthy glow to dull, dry skin,.which may then benefit as much from the antioxidant properties of lemon as the rich nutrition of almond oil.

Ingredients

  • ½ cup sea salt
  • ½ cup sweet almond oil
  • ½ tsp finely grated lemon zest

Instructions

Combine all ingredients, taking extra care not to let any water touch the ingredients, as it will dissolve the salts. Store in an airtight container in a cool, dry place. Before showering, swirl ingredients together with fingertips to reintegrate, then apply to body in firm scrubbing motion with hand or soft washcloth. Step into the shower and let power of the water stream rinse off the mixture. (Particularly effective as an exfoliant and moisturizer for a smooth, nick-free shave.)

Almond-Oatmeal Scrub

Almond meal and oatmeal slough off dead skin cells, as sage tones. Whole-milk yogurt reinforces with the oil naturally released from the almonds during scrubbing to replenish the skin's natural moisture.

Ingredients

  • 2/3 cup coarse ground almonds
  • 1/3 cup dry fine oatmeal
  • ½ tsp dried sage
  • plain full-fat yogurt as needed

Instructions

Add almonds, oatmeal, and sage to food processor or blender and grind on pulse until they reach the consistency of course meal. Keep covered and cool in an airtight container until ready for use. Upon each use, take medium-sized handful (around 1/4 cup) of the mixture and combine with enough yogurt to form a thick paste. Rub gently over skin with a washcloth or loofah sponge and rinse with cool water. Follow with gentle moisturizer.